Most of the time, removing seamlines in the head area can be the most challenging as it involves separating the head’s internal for painting purposes. A lot of thinking has to be put into the cutting process to assess what will be the best approach (there can be many ways to do it, what I presented is my way 🙂 ).
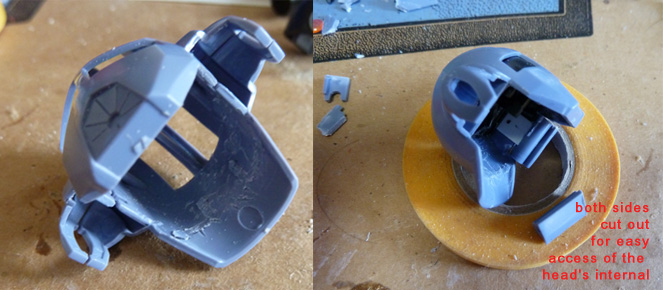
As can be seen in the picture below, I have cleared all the pegs and connectors inside the head section. Both sides were also cut out and can be inserted back in later.
The “antennas” were previously separated. The head’s internal, after some trial fitting, the back has to be “shaved” a little bit so that it can be inserted back into the head without any obstructions. Note: be careful not to shave too much or else there will be a visible gap at the back of the head’s internal. Cut a little bit at a time and dry fitting it until it can go in smoothly.

A hole was drilled for the eye’s len (This placement is up to individual, but you have to look out for areas where you can drill passed the plastic). A placeholder was then fitted to accomodate the len (not shown, will be placed after completion). Next, we will see how the internal are being positioned back into the head. First, position and insert the internal’s back (rear side) in.

Normally one will need to test fit the internal positioning numerous times in order to get it right. You will find yourself spending more time to remove areas where they obstruct the placement i.e. sanding down any protruding areas. Once you got it right, the internal will able to be inserted and taken out easily without any obstructions.

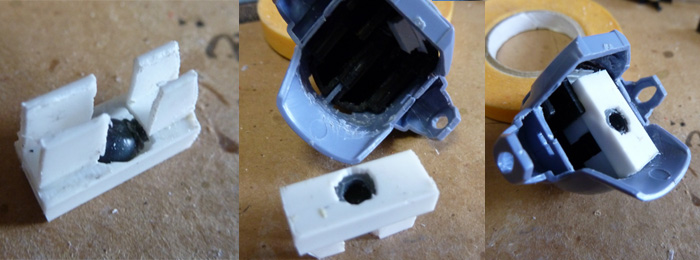
The last step is to “reconstruct” the head connector area. Due to the head’s internal separation process, the connector will also needs to be aligned back. Again, there are many ways to do this, you can try whatever methods/approaches (based on the resources you have on hand), as long as it can get the job done. What I have presented is to use square tubes, drilled a hole a little bit smaller than the connector polycap, forced it in so that it’s tight. Of course you will still need to sand to make sure the tube can be fitted in nicely.